


Description
The 
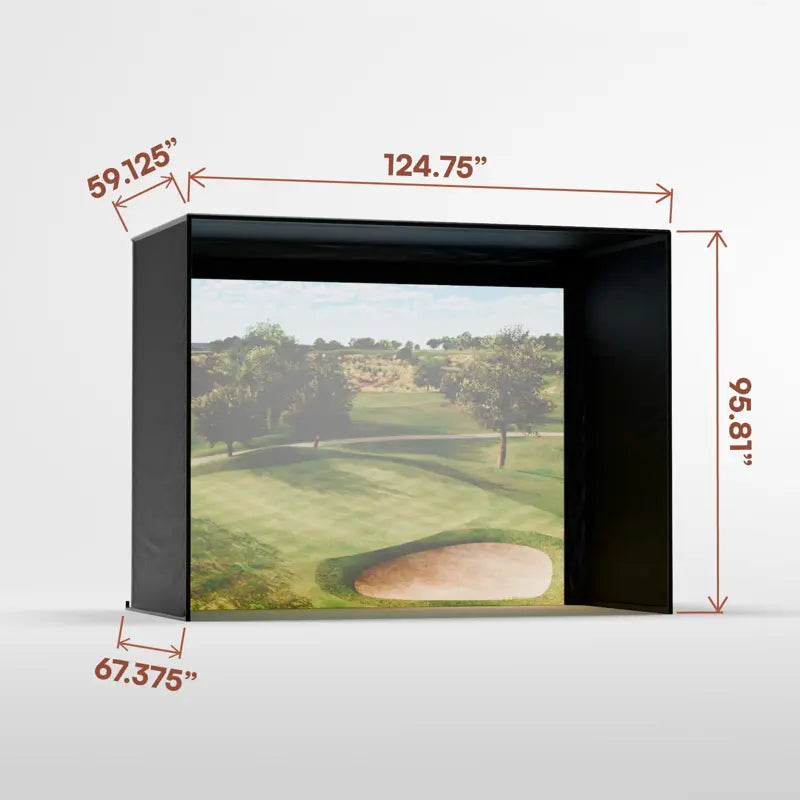
Carl's Place C-Series DIY Golf Simulator Enclosure Kit with Impact Screen is built for residential indoor golf studios. With a seamless turf-to-screen look and a borderless bottom, it delivers a fully immersive practice experience. The enclosure comes in 6 sizes and the impact screen in 3 materials, giving you maximum flexibility to fit virtually any space.
Carl's Place enclosures and impact screens use premium materials and are designed for easy installation. Pair with the Carl's Place Pipe Framing Kit for a fast, hassle-free setup.
Please note: Framing pipes are not included. If you do not purchase the Carl's Place Pipe Framing Kit accessory, you will need to buy 1-inch EMT pipes from your local hardware store to complete your DIY Enclosure. Review the recommended accessories below to ensure a seamless setup.
Before purchasing, please check the Specifications tab to confirm the Overall Enclosure Dimensions for the size you select will fit your space.
What's Included
Your Choice of Impact Screen Material
Choose from Carl's Place Standard, Preferred, or Premium screen materials. Each delivers a floor-to-turf image with a bottomless edge and minimal bounce back.
Black Nylon Enclosure
Durable nylon enclosure surrounds the simulator, catching stray shots and enhancing immersion.
Steel Fittings
Corner fittings connect the frame pipes. We recommend the Carl's Place Pipe Framing Kit; otherwise, purchase 1-inch EMT locally.
Ball Bungees and Zip Ties
Includes releasable zip ties plus 6' and 9' ball bungees to secure the screen. Extra pieces let you fine-tune tension and slack for image quality, sound, and rebound.
Accessories
Net Wall Extensions
Attach to your frame to catch errant shots left and right of the hitting area. Hook-and-loop strips affix to the frame; sandbags (fill not included) secure the bottom.
Pipe Framing Kit
Essential for a hassle-free build. Pre-cut, black powder-coated EMT pipes sized precisely for your enclosure.
Foam Inserts
Protects the enclosure frame from mis-hits. Pre-sized foam fits behind screen flaps for extra peace of mind.
Safety Baffles
Ceiling-mounted baffles across the enclosure width help protect against high shots.
Back Cover Kit & Back Cover Pipe Kit
The Back Cover blocks rear light for better image quality and a polished look that hides frame components. The Pipe Kit eliminates the need to source pipes locally.
Please Note: When purchasing Pipe Framing, Foam Inserts, Safety Baffle, Back Cover Kit, or Back Cover Pipe Kit, match the accessory size to your enclosure size. Safety Baffles should match the enclosure width.
Specifications
Depths: Standard 5' depth. The frame footprint extends approximately 1' behind the screen.
Assembly
EMT Requirements
Unless you purchase the Pipe Framing Kit, you will need 1-inch EMT (electrical metal tubing) from your local store. Note: 1-inch EMT is the US trade name; actual outside diameter is 1.163" (27 mm).
Documents:
- Carl's Place C-Series DIY Enclosure Assembly Instructions & User Manual
- Carl's Place Back Cover Kit for DIY Golf Simulator Enclosure
DIY Golf Simulator Enclosure Kit Cut Sheets:
- 7.7'H x 10'W DIY Golf Simulator Enclosure Kit Cut Sheet
- 7.7'H x 13'W DIY Golf Simulator Enclosure Kit Cut Sheet
- 8'H x 8'W DIY Golf Simulator Enclosure Kit Cut Sheet
- 8'H x 10.5'W DIY Golf Simulator Enclosure Kit Cut Sheet
- 8.5'H x 11.5'W DIY Golf Simulator Enclosure Kit Cut Sheet
- 9'H x 12'W DIY Golf Simulator Enclosure Kit Cut Sheet
DIY Golf Simulator Enclosure Back Cover Kit Cut Sheets:
FAQ
Q: How far should I stand from the impact screen?
A: For safety, stand at least 10–12 feet from the screen.
Q: Can I iron or steam the impact screen?
A: Do not iron. Unpack promptly to reduce wrinkles. Most wrinkles smooth under tension with zip ties or bungees. If needed, use a clean consumer steamer with distilled water.
Q: Can I wash the impact screen?
A: For minor stains, dab with dish soap on a damp cloth, then air or low-heat dry. For tougher spots, try Tide To Go or non-abrasive cleaners like LA’s Totally Awesome or a carpet cleaner.
Q: Any safety considerations?
A: Follow the assembly manual, keep bystanders out of swing range, and protect nearby walls, ceilings, and windows. Review Terms of Sale before use.
Q: Do I need a hitting mat?
A: Yes. A quality mat protects your joints and improves realism. Choose a size that fits your stance and any right/left-handed needs.
Q: Differences between Carl’s enclosure kits?
A: DIY is budget-friendly and simple; Pro adds premium materials and sizes for commercial-grade setups; Curved provides a panoramic, immersive screen.
Q: How much buffer space is required?
A: Allow at least 2–3 inches of clearance on height and 2–3 inches on each side for width. C-Series includes a rear backset fitting that adds 8.25 inches to depth.
Q: How much total space do I need?
A: Consider buffer space, enclosure footprint, launch monitor requirements, safe golfer distance (10–12 ft), golfer height, club length, turf thickness, and nearby doors/furniture.
Q: What if the black enclosure fabric is hit?
A: The black fabric is not intended for direct hits, but incidental contact from rebounds should not cause issues.
Q: What pipes are required?
A: DIY uses 1-inch EMT. You can add the pre-cut Pipe Framing Kit or source EMT locally. Pro and Curved kits use 2-inch EMT.
Q: How long is assembly?
A: About one hour depending on size and assistance. Refer to the manual and video linked above.
Q: What are EMT pipes?
A: EMT stands for Electrical Metal Tubing (also called conduit). Use EMT, not PVC, as PVC is incompatible with the fittings.
Q: Where should I mount my projector?
A: Placement depends on viewable screen size and your projector’s throw ratio. Contact Elite Indoor Golf for exact mounting guidance. Common options include flush/drop ceiling mounts or floor mounts.
Q: How do the ball bungees attach?
A: From behind the screen, thread the loop through the grommet, pull over the frame, then secure the cord over the ball.